Fall has arrived in full force, and with it all the celebrations of the season. Perhaps more than any other seasonal festival, Halloween creates a mood. I love this holiday for the wealth of creative opportunities it generates. I also enjoy challenging myself to create Halloween decorations that are creepy, without being “gross”. In my opinion, subtlety can be just as eerie as “blood and guts”. Plus, it feels more child friendly.
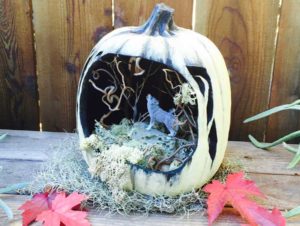
It was my quest to create “no-gore” decorations, that led me to create this fun and easy piece.
Supplies for this Project
- Artificial Pumpkin
- Pumpkin Carving Tools
- 1 large brush and 2 smaller round brushes
- Acrylic Paints in Black and White
- Disposable Palette Paper (optional, but makes cleanup a cinch)
- Floral Foam
- Craft Glue
- Reindeer Moss
- Battery operated LED lights
- Wolf figurine
- Rocks, sticks, pine cones, and other natural items that you can find

You could also use a real pumpkin for this project and it would save some money. However, if you’re looking for longevity and ease of carving, an artificial pumpkin will serve your needs better.
Check your local Dollar Store for supplies before ordering online. Ours currently has floral foam, carving tools, and reindeer moss.
Before You Start
Put on a sweater, grab a basket, and head outside on a nature walk!
Check local parks, trails and even your own backyard, for interesting elements from nature to use in creating your scene. Look for things like small puffs of moss, pieces of lichen, unique rocks, leaves and bare sticks. I tried to choose sticks that curved like little trees, and twisted into eerie formations.
Or, if you’re a city dweller, there are a variety of neat natural materials available to purchase online too, here are some great links:
Step 1
Gather standard pumpkin carving tools. I find that the tools specifically designed for carving pumpkins are superior to regular knives.
Then, using the tools, carve out an oval shaped opening on the front of your pumpkin. On the reverse side carve out a half-moon shape.
If you want to make it extra decorative, also carve out some “tree limbs” along the edges. Think about using negative space to create the outlines of a tree as you carve.


Step 2
It’s time to paint!
Begin by using a large brush to thoroughly coat the inside of the pumpkin with black paint. Be sure to paint all of the cut edges black too (except for the moon).
Using white paint, coat the inner edges of the moon with a medium sized brush.


Step 3
Now it’s time to make your pumpkin look more realistic and spooky!
Water down some black paint by mixing several drops of water with the paint on your pallet. Then, using a small brush, begin to accentuate your pumpkin. Add paint to specific areas, like where the “branches” meet the “tree”.
Apply a small amount of the thinned paint to the external part of the pumpkin, and drag the pigment along the groves using your brush.
Also starting on the bottom (for practice) accentuate the lines and curves of the pumpkin in the same way. Fill valleys and dents with thin black paint to create shadows and depth.
If you feel like the marks you have made are too dark, you can always lighten then up by gently running a damp paper towel over the painted surface.
Once you feel confident in your technique, move to the top of the pumpkin and repeat the process. I also like to go back with white paint and add some highlights. With a small brush gently apply small amounts of white to raised surfaces, high points, and anywhere that would naturally catch the light.
Let the paint dry for about ten minutes.


Step 4
Use any piece of paper to cut a rough circle large enough to cover up the hollow bottom of the pumpkin. Using white craft glue, adhere the paper to the inside of your pumpkin, so that it covers the hole in the bottom.
Fill the bottom of your diorama with floral foam. A large block of floral foam is easy to cut to size using a regular table knife.
Generously cover the inside bottom of your pumpkin with more craft glue. Add several blocks of floral foam. I like to stack several blocks on top of each other to create a “hill”.
Then cover in glue again.


Step 5
Now, start adding visual interest to the inside!
Cover the floral foam using a material called “reindeer moss”. I found that the lighter (off-white) shades looked the best against the black “night sky” background. While the glue is still wet, tuck pieces of moss inside the pumpkin, taking care to cover all of the floral foam.
Next, add the sticks you collected. Start by putting the largest ones in the back. Secure them by simply pushing them down into the floral foam beneath the moss. For added interest I like to let some of the sticks escape out of the front of the pumpkin.
Next add a wolf figurine. Be sure to place him (or her) so that he’s howling at the moon!
Lastly, to illuminate the inside, tuck a battery operated string of LED lights into the back corners of your scene. I like to use the lights that are labeled “warm white” and come with a timer option.
Finished – Admire your work!