The apples are red, the breeze is crisp and cool; Fall is in the air! And, nothing seems to represent this season better than the humble pumpkin. Often found in shades of vibrant orange, these delightful gourds embrace all that is Autumn. I’ve always loved decorating with pumpkins. I am especially delighted when I find one with tendrils of spiraling vines still attached. Luckily, I’ve found an easy way to make my own pumpkins that will last for years to come!
This fun project incorporates everything that makes pumpkins so wonderful, and it will also provide you with pumpkins to enjoy year after year.
Using this tutorial, you will transform a simple roll of toilet paper into a delightful Fall decoration!
Supplies for this Project
- Some rolls of toilet paper
- Various pieces of fabric, in a mixture of oranges and greens.
- A “Fat Quarter” of orange fabric (18 x 21 inches) is the ideal size for one pumpkin.
- Raffia (natural/ tan)
- Pieces of driftwood or sticks
- Scissors
- White glue
- Paper drinking straws, or an old pen
- A serrated knife (optional: for making pumpkins of various heights; not a necessity)

Step 1 – Gather the Fabric
Fabric stores will often sell pieces of fabric pre-cut to 18 x 21 inches for quilting. They are marketed as “fat quarters” and are the perfect size for making these pumpkins. You can easily purchase a nice assortment of “fat quarters” on-line too.
Or if you are starting with larger pieces of fabric, you can the orange pieces to about 20 x 20 inches. Using scissors, roughly cut close to this size. This piece will form the orange part of your pumpkin.

Step 2 – Wrapping the TP
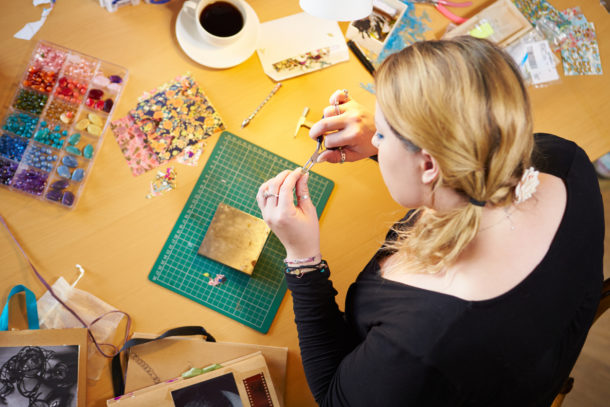
Place a full roll of toilet paper in the center of a piece of your orange fabric. Then, simply tuck the corners of your fabric into the middle of the cardboard roll.
I alternate tucking each side into the roll, starting with the corners. Just keep tucking until you don’t see anymore edges. It’s so easy!


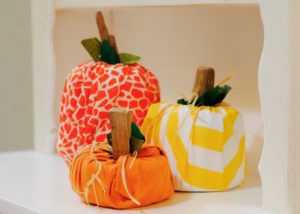
Step 3 – Make a variety of sizes (optional)
In nature, pumpkins grow to different heights. It’s simple to create some variety with these pumpkins too. To do so, just use a serrated knife to cut a roll of TP in half. Children will need help (or supervision) with this step. My kids liked to use their own (child safe) knives to help with this step. They worked pretty well, but I still needed to use the sharp metal knife a little but too.
To make short pumpkins, simply follow the steps above, tucking orange fabric into a (previously cut in half) short roll. And, for taller pumpkins, try stacking the other cut half on top of another roll of TP. Again, just cover and tuck!
Continue wrapping and tucking different sized rolls, until you have a variety of heights.


Step 4 – Make Your Stem
Gather a your pieces of driftwood, about 1-3 per pumpkin (sticks would work too) and your raffia. Stick pieces of driftwood into the center of the roll, leaving a couple of inches exposed at the top.
To make the vines, use raffia, glue, water and a straw.
First mix a small amount of 3 parts water and (about) 1 part white glue. Swirl in a jar to mix. Then, add a few long pieces of raffia to the mixture.
The idea is to saturate the raffia in the glue/ water mixture. I found the easiest way to do this was to simply put a lid on my jar, and shake it a few times.
Remove the wet raffia and wrap it around your straw (or an old pen would work too). Lay the whole thing in the sunshine to dry for a few hours (or leave out overnight).


Step 5 – Make the Leaves
While the raffia is drying, start making your leaves.
Chose green fabric in a variety of shades and patterns. Then, using your scissors, loosely cut out “leaf like” shapes. Since you’ll also be tucking these into the center of your pumpkin, be sure to cut at least 2”-3” of “stem” to hold your leaves in place.
I mimicked the rough shape of a pumpkin leaf by cutting my green fabric into rounded “arrow” shapes. You can also think of the as “heart shapes on sticks”.
Cut enough leaves so that you have about 2-3 for each pumpkin. Then tuck the stems into the center of your pumpkin, in with the driftwood.
If you need to, you can use a piece of wood to push the stems down into your pumpkin. Leave about an inch or two of leaf sticking out. Continue, until all of your pumpkins have lovely leaves!

Step 6
Check to see if your raffia is dry. If it is, gently unwind it, trimming pieces with scissors (about 3”-10” long) as you go.
Then lightly swirl the pieces of curly raffia around the top of you pumpkin, tucking small parts in with the stem to secure.
I like to let a few ringlets dangle down along the side of the pumpkin, and onto the surface below.

Have fun distributing the pumpkins throughout your home, blending them into your decor and tucking them into corners. I find that these pumpkin look best when grouped in various sizes, and in groups of 3’s.
These delightful pumpkins make great gifts too.
Thanks for stopping by, and happy crafting!